
Hi there!
I’m Jen, the party girl behind Passion-for-Parties.com,
and I am super excited to be here guest-posting on The 36th Avenue!
Today I’m sharing with you an adorable Halloween treat that your kiddos will love!
I hope you enjoy it!

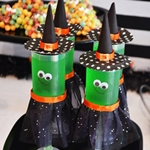
These Witch push-up pops are just too stinkin’ cute for words!
Push-up pops are all the rage right now, so I wanted to put a fun holiday twist on this popular treat.
With just a few simple embellishments and some green Jello, these Halloween goodies were born.
You’ll Need:
Push-up pop containers (two containers for each push-up pop)
Googly eyes
Black crepe paper
Black cardstock
Gold paper
Mini polka-dot cupcake wrappers
Orange ribbon
Black tulle
Purple tulle
Hot glue
Double-sided tape
Red and black Sharpies
Green Jello

For each witch’s hat, cut one 3 1/2″ x 2 1/2″ square from black cardstock. Trim the top edge of the square to resemble a rounded edge, as seen in the image above. Roll into a cone shape and secure with double-sided tape.
Cut one 2-inch circle from black cardstock for each hat. I used a 2-inch circle punch to make the job easy. Flatten the mini cupcake liners; secure the circle to the center of the back side of the liner.
Add a small amount of hot glue to the edges of the cone, then secure to the top of the cupcake liner.
Measure a length of ribbon to wrap around the base of the cone (mine was cut between 3 and 3 1/2 inches), then secure to the cone with hot glue. Cut a small rectangle out of gold paper. Cut out the center to resemble a buckle, then adhere to the center of the ribbon.

For each skirt, cut one 6 1/4″ length of ribbon, and one 15″ x 2 3/4″ length of each color of tulle (image 1).
Layer the tulle strips on top of each other and align with the edge of the ribbon, secure with hot glue (see image 2).
Fold the tulle back on itself to create a pleat; secure with hot glue (image 3). Repeat all the way to the end of the ribbon (image 4).
Use hot glue to secure the completed skirt to the bottom edge of the push-up container.

Attach eyes to each witch with dabs of hot glue. Use a red Sharpie to draw a mouth on each witch. Add eyebrows or other details that you’d like with a black Sharpie.
Use the disk from the spare container you’ve designated for this project, and secure it to the bottom of the stick to create a stand.
Fill with green jello and allow to set. Top with hats.
Note:These are not sealed containers and the Jello leaks a bit before setting. I recommend placing the containers on a foil-lined tray to catch the drips and avoid a mess in your refrigerator.
Aren’t these fun?!!
Thanks so much for hanging with me today, and tremendous thanks and hugs to Desiree for allowing me to be a guest on this fabulous blog!
I’m beyond honored!
If you’d like to visit me in my neck of the woods, I’d love to have you!
Happy Celebrating!
Jen
xoxoxo

So very cute!
I would love for you to visit Passion-for-Parties.com for tons of party ideas.
I am talking about one stop for everything you need for your party planning!
 |
 |
 |
 |
 |
 |
 |
 |
 |
You can also find Jen on Facebook, Twitter, Pinterest, Website and Blog.
Thank you so much Jen for visiting and sharing such a fun Halloween Treat with us.
Happy Friday My Friends!
Besos
Desirée

These are the cutest things ever. A little work involved here, but they’re just adorable so worth the effort.
QUESTIONS: The Hat: 3.5″ X 2.5″ square with rounded edge. I’m not quite following that as I don’t see a square in the photo.
Where do you use the black crepe paper?
The Skirt: Since the tulle is hot glued to the ribbon, when you make the pleats, you’re also making pleats in the ribbon. So…..how many and how wide are the pleats so it fits around her cute little waist?
COMMENTS: You could use a plastic cap (like for a soda but bigger) for the stand rather than waste a cake pop holder.
Jello might be tricky, but love the iridescent glow it gives. How about using green cellophane for the face? Then you could fill “her” with anything.
If you can answer my assembly questions – I’d really appreciate it as I definitely see these in my not too distant future 🙂 Great idea and the cutest thing I’ve seen thus far for Halloween!
Hi… what a wonderfully creative post… LOVE! I’m wondering why you need 2 push up containers for each witch. From the instructions, it seems I would only need one for each… help! Thanks.
oh i just <3 these 🙂
Thank so much, Lisa! 🙂
Adorable! And love that they are so simple to make, but don’t look it! LOL, thanks so much for sharing:)
I’m so glad you like them! I hope you’ll give them a try! 🙂
I’m so excited that I’m squealing! SO very honored to be featured on The 36th Avenue…truly grateful! Sending big hugs and thanks from the bottom of my heart! xoxoxo
It is so good to have you! Thank you so much for sharing your fun tutorial over here. Wishing you a wonderful weekend!
100% adorable!!!! How fun is that!
I agree… so cute! Have a wonderful weekend Gina!
Thank you so very much, Gina! 🙂