
DIY Melted Beads Crafts and Accessories are so much fun to make! My girls love making hair accessories and handmade jewelry with them and also they make the cutest party favors and handmade gifts… Take a look!
DO NOT COPY, SAVE, OR PASTE THIS COLLAGE IMAGE.
Have you ever made accessories with melted beads? They are so fun and easy to do!

During the weekend we made some melted bead jewelry and a few bookmarks.
My girls could not stop making their own earrings and seriously this is so affordable that
you don’t feel bad when they lose them.
Look how cute they look… So fun!

If you have never melted beads before let me tell you, this is a 15 minute project.
You can make a ton of jewelry, bookmarks, hair clips, and even magnets for under $5.
MATERIALS
Color Pony Beads – Find them HERE
Parchment Paper – Find It HERE
Optional: Toaster Oven – Find It HERE
TUTORIAL
The first thing you want to do is preheat your toaster oven at 425 degrees F.
While the toaster oven heats up place a baking parchment paper on top of a cookie sheet.
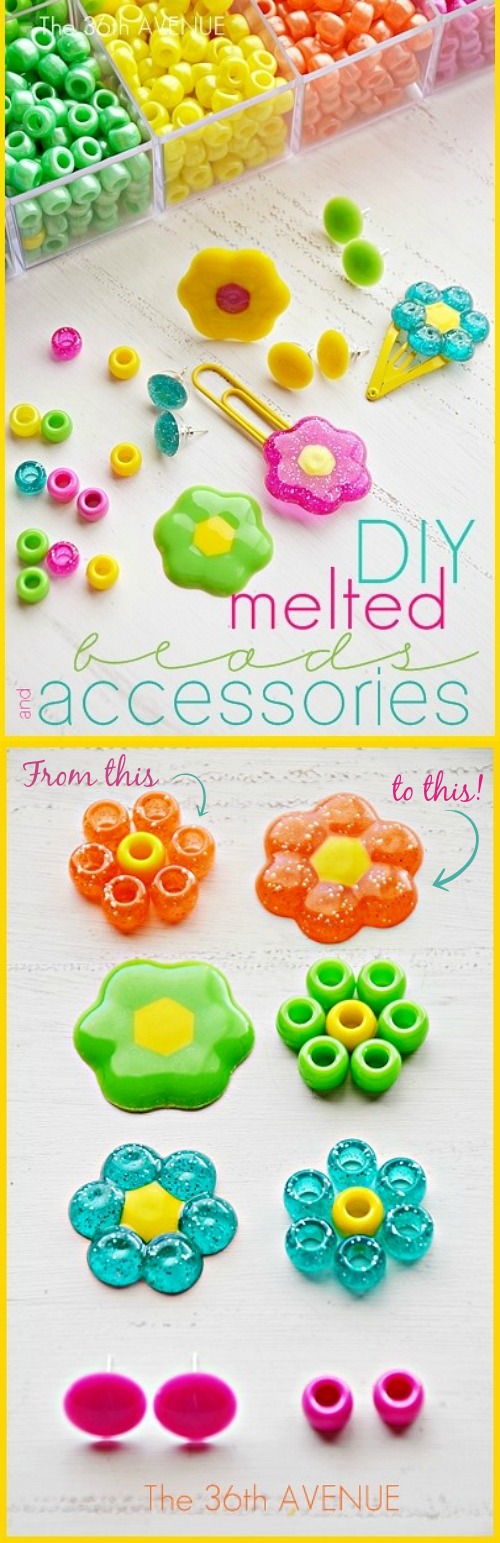
Make the shapes placing your beads to your like.
Have fun mixing colors and playing with different combinations.
You can see below what the beads look like before and after melting.

The flowers will take 10 minutes to melt. The earrings will take between 8 to 10 minutes.
Important: This is an OUTSIDE project.
Plug you toaster oven outside and play in your backyard!
Update: Some of my readers have shared that they have melted the beads in a gas grill outside and it worked. So there you have two clever options to melt the beads out of the kitchen.
Brilliant idea!
Here is how the single beads look after melting.

After the melted beads have cooled down pull them out.
You can create a bunch of things with them.

We made hair clips…

…bookmarks

…and my favorite, the earrings and rings.
Simply glue the backs to the melted beads.
UPDATE: I have a reader that suggested to use E3000
or a similar epoxy glue for a stronger bond,
that way they won’t fall apart.

Do the same to make the ring…

These accessories make the cutest party favors and gifts.
Assemble them in a small tag and give them for birthday and Christ.mas presents
You even have time to make them for Easter Baskets.
My girls and their friends love them!

And I love them too…

Thank you for the visit my friends… Have a colorful day!
Besos
Desiree
(This post contains affiliated links)

What a cute idea! I am going to make these for my nieces. Love it!
What kind of beads do you use.? Glass or plastic?
Use plastic ones!
You don’t say how long it takes. I tried my BBQ and it melted some more than others. And they didn’t retain their shape. Maybe too hot.
BRILLIANT!!! Thank you!
DO YOU think there is another type of bead without a hole in it to prevent the little divots? I’m guessing most beads have holes in them, but i’m going to poke around my local craft store and see what i can find!
Thanks for sharing the melted bead tutorial.
Love it! Thanks for the idea!
I don’t have a toaster oven. Can I do this in my oven?
Yes you can but smells pretty strong.
Hi I was wondering if you could melt other plastics like, bottle lids, yogurt pots etc?
I’ve never have tried anything else… I see an experiment in the horizon!
I am making a second set and the smell isn’t bad with mine. I am using my oven. I am trying to make a house with this batch. lol thanks for sharing this is cool.
I just wanted to know why u are not able to do this cool craft inside with a toaster oven?
The smell of melted plastic is REALLY strong.