
Because I like you a LOT
and because I have received let’s say quite a few emails asking me how to add the “Pin It” Button to my Fabric Wreath POST,
I thought to share with you today how to do it… or how I did it!
I am a simple person and I don’t understand computer engineering words…
so if you are like me just a girl that loves pj’s and non fancy vocabulary TUTORIALS, stay and bare with me while
I try my best to explain how I did it!
I try my best to explain how I did it!
Here We Go!
{1}
Write and publish your AWESOME post.
{2}
Go to Pinterest-About-Help-“Goodies”
or just click down here:
{ …didn’t I tell you I like you a LOT 😉 }
{ 3 }
FOLLOW these DIRECTIONS
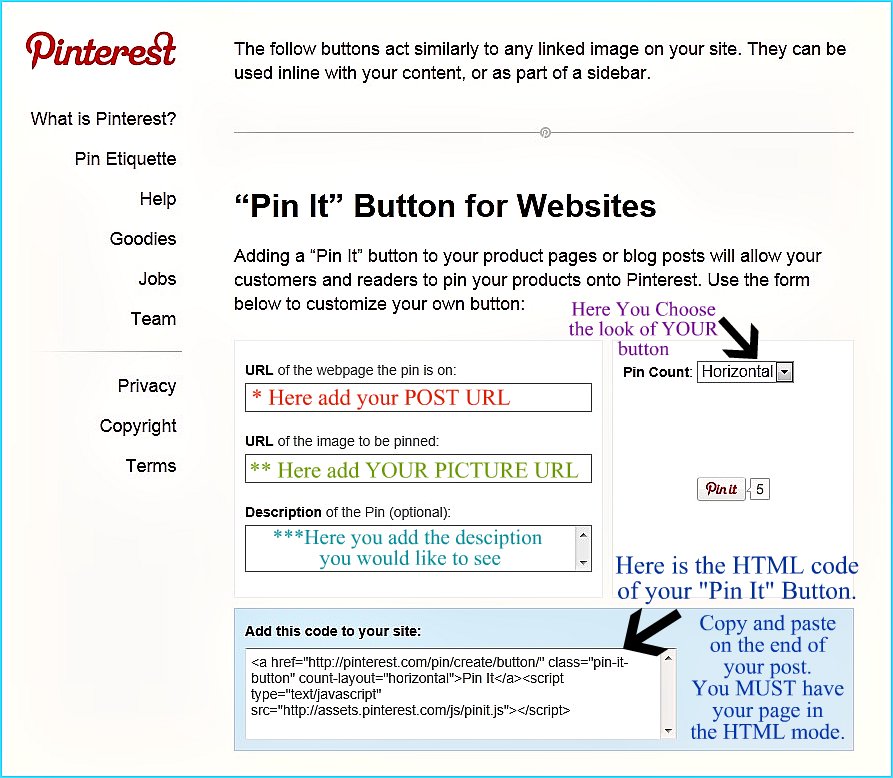
…Just in case you need EXTRA help!
* POST URL: After publishing your post, copy and paste the post URL from your browser. For example the one with my wreath is…
**URL-IMAGE: This I had no idea of how to do it… so if you are like me this will be helpful.
YOU NEED TO CHOOSE THE ONE IMAGE THAT YOU THINK IS BEST TO PIN.
Right click on the image and go down to where it says
“Copy Image Location” or ” Copy Shortcut”
After, just paste that code into the box.
***Description of the Pin: This is the small description that you’ll normally add to your box when you pin something! If you decide to do this you may want to keep it simple with key words that describe your post.
All you have left is to choose the look of your button,
copy the HTML CODE and paste it on your post.
Remember that your post MUST BE on HTML mode
not in COMPOSE mode.

If you want to add a little something on top like this…

Just go back to compose and add your sentence!
You are done!
It sounds more complicated that what it really is…
It won’t take you more than a few minutes.
IMPORTANT:
Keep in mind that this process needs to be done in each individual post where you want the “pin it” button to be.
I promise it will take you less than TWO minutes.
Have FUN my ladies and make this Monday count!
Besos!

This is great! I was just wanting to learn how to do this and you helped me perfectly! I am excited to try it out on a post. I'm your newest follower, I found your blog on Hope Studios. So glad I did!
-Robyn from http://tipsfromtheheart.blogspot.com
Thanks for the tip!
I love you. You are my new hero.
Lisa
the enchanted oven
This is great, thank you!
You're so kind to share, can't wait to try it!!! Michelle
Thank you! This was so easy! I used it at http://jensennp.blogspot.com/2011/09/halloween.html
Great tip! I just tried it out. So easy! Thank you.
This is great!! Thank you!
evie @ brown paper packages
This was uber helpful!
I was totally able to finally figure out how to add a photo to it! 🙂
Biz
Thank you so much !
absolutly great tip.