
Back to school is around the corner for us! Next week all my kids will be back in school… Where did Summer go? Are you feeling like Summer is slipping away and it is time to get organized again? I’m bringing back a great organization DIY Project, our DIY Dry Erase Calendar!

Seriously where did time go?
Well, last year school caught me unprepared so this year I decided to try my best to be a little more organized.
Yes I am the mom that takes her daughter to dance class the day where I’m supposed to take my son to Scouts.
As you can see I need help… so this year I made a Back to School Fridge Station.

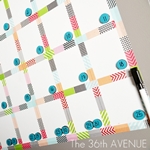
I am showing you how to make this Vinyl Washi Tape Calendar to get things more organized.

MATERIALS
All you need to make this project is…
High gloss vinyl – You can find it HERE
Scissors, a marker, tape measure, ruler,
Washi Tape – You can find it HERE
TUTORIAL
The first thing you want to do is cut a piece of vinyl. I made mine with just 4 horizontal rows and the dimensions of the vinyl were 24″ w x 16″ h. I chose to do four rows because I didn’t want to cover a huge area of my fridge. If you decide to make the traditional 5 week calendar cut your vinyl 24″ x 20″. 
Next step is to make the boxes for each day of the week. Using a ruler or tape measure, mark, and divide the width of the vinyl in 5 equal 4″ parts, or 4 equal 4″ parts if you are making your calendar like mine. When you are done create seven vertical 3.5″ spaces, one for each day of the week. The Sunday will be slightly longer but you won’t be able to tell after it is all done.

After you have your lines marked it is time to stick the vinyl to the fridge.
Gently peel off the vinyl as you would do with a sticker.

You may want to get some help at this point.
Carefully place the vinyl on the fridge.
You can’t see the marks of the measurements on the picture but they are there.
If you want you can trace the lines… I was too lazy to do so.

Next it’s time to add the washi tape. The only thing you want to keep in mind is to center the washi tape with the lines of the calendar. That way it would look even!

Repeat this until your calendar is finished…
I purchased this cute decals and magnets at Wal-Mart.
I added one of the decals to the top of the calendar for the month.

My girls helped me out tracing, cutting and sticking some vinyl to the magnets.

I used a permanent black Sharpie to write the numbers for each day of the month.
I love the fact that my girls made them and that they look perfectly imperfect.
So cute! 
Well… at this point we are done!

Because it is on the fridge now it is a magnet board, a white board and a calendar.
Isn’t it cool?

If you missed the rest of the station I hope you take a minute to check out the
Back To School Fridge Station HERE

Here are some other Back to School projects that we love!
Dry Erase Chore Chart Printable – Click HERE

Home Lunch Ideas – Click HERE

Back to School Emergency Kit – Click HERE

Thank you so much for stopping by!
Make sure to subscribe so you don’t miss a thing!
XO
Desirée

I was able to find White vinyl dry erase paper at Michaels!
Amazing!! I never would’ve thought of this; I love it! I love that the magnets can be moved around for those always awkward squares that have to hold multiple days. Thanks for sharing! -Emily