
Hey there !
I’m Lynne from DESIGN THE LIFE YOU WANT TO LIVE.

My blog is filled with DIY, design ideas, travel, an adult sized tree-house, inspirational photography and even cancer.
Yup cancer.
I have been known to tell CANCER to kiss my butt a few times. In my outside voice. Dangerous living. LOL.
I like to blog with a twist of wit and a bit of nutty funkiness. I truly believe that a great attitude and some big belly laughs are a a great way to enjoy life.
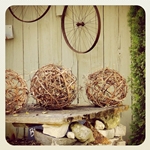
Today I am sharing with you my DIY Grapevine Balls tutorial.
You can visit my blog DESIGN THE LIFE YOU WANT TO LIVE later and learn about the story behind it.

SUPPLIES
1. Grapevine.
(if you don’t have grapevine, you can buy a grapevine wreath and take it apart to use as your grapevine).
It is perfect since it is already in a circular shape.
2. Wire to cut into small pre-cut pieces. I usually cut about 30 pre-cut pieces.
This wire will be used to secure the grapevine together as you are wrapping the beach ball.
Pick a gauge like what you see in the photographs below. I didn’t pay attention to what number it was. There are no rules. We are here for good times, kids.
3. Wire cutters
4. Beach balls ( a few varying sizes )
Buy varying sizes of balls. Make sure you buy the kind of beach balls that you can deflate.
The variety of sizes means that you will have a variety of finished sizes of grapevine balls.

GRAPEVINE BALLS TUTORIAL
1. Gather up your grapevine, strip it of the grapes and leaves.
Wear gloves. Do not get a manicure the day before. Been there. Done that. It was dumb.
Grapevine looks like this :

Pick the grapevine when it is still growing, soft, and pliable. If you pick it, and let it dry out, it will crack and be too dried out to really work with it.
It can be done, but only if you want to do things the hard way. I like the easy route – myself.
DETAIL SHOT OF GRAPEVINE :

2. After you have stripped the grapevine, you are left with the stem {the brown woody part that you see in this picture}.
Begin to wrap it around a beach ball.
Remember, you need to deflate this beach ball when you are done, so be sure to get a deflatable ball.
I usually deflate the ball after the grapevine ball starts to take shape.
Don’t try and sneak the beach ball out after you have made a FULL GRAPEVINE BALL.
You will definitely need to murder the beach ball if you wait that long.
Pull out the beach ball while you still have ROOM to pull it out.

3. Have your wire and wire cutters handy.
I prep a bunch of pre-cut wire, so I am not wrangling with the wire cutters, wire, ball, and grapevine all at once.
I am not that coordinated.

4. As you wrap the beach ball with the grapevine, secure it with your pre cut wire to ensure a solid hold.
It will seem tricky at first, sort of like rolling a mammoth ball of out of control wool.
Once the ball gets going though, it gets easier.
Check out the glam working gloves. HAWT.

5. After the grapevine ball starts to take shape, you can now deflate your beach ball,
and continue working on building up more grapevine.
Just keep adding the grapevine, in circles around the ball, like you are rolling a ball of wool.
A big ball of wool. Something that the green giant would use to knit a sweater.
Don’t sweat it too much if you don’t get all the grapes and leaves off the ball.
They will eventually dry up and fall off. Like a baby belly button. Except that was a gross analogy.

6. When you are finished , you need to stand back and admire it.

I hope you enjoy the tutorial.
Cheers !!

Oh my!
I love them! What a cool DIY project, especially for the Fall season.
You really have to visit Lynne’s blog and see how she added lights to them and hung them from a tree in her yard,
to give light to her office, which happens to be this GORGEOUS Tree House!
Shut the front door!

Also click here to learn how to make wire balls and see some other pretty cool creations.

You can also find Lynne from DESIGN THE LIFE YOU WANT TO LIVE on
Design the Life You Want to Live on FACEBOOK
Thank you so much Lynne for visiting with us today and sharing this awesome tutorial with us!
Happy Wednesday!
Besos
Desirée

I love this tutorial!!! and you are funny. I love this look, especially now that we’re moving into fall, and I am trying to motivate myself to make small ones for inside the house and big ones for outside on our front and back porches.
Thanks for sharing!
these look great! I never actually thought they can be made 🙂
They are totally cool – and I love that they are giant sized for out door use! 🙂
i want to make them this very second. but not before i visit this gorgeous blogger lynne.
awesome post!
michele
hello lovely