
I got to share my Message Pillow Cases at Tatertots and Jello…
Today I get to share it with you here on my blog…

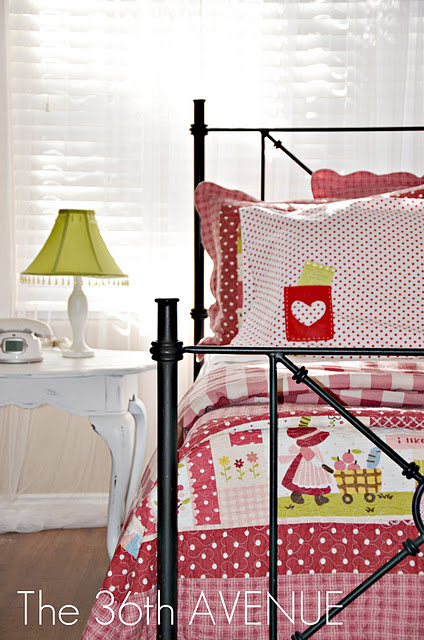
Every Christmas I make a pillow case for each of my kids.
This year I decided to add some fun EXCHANGEABLE pockets to them and give the pillows away in the last day of October.
I can’t believe November is here and Thanksgiving is just around the corner!
WHERE DID THE YEAR GO?
Anyways, during this month me and my sweet husband will be filling up those pockets with notes that express
why we are grateful for each of our children individually.

Do you have any special traditions that you do during the month of November?

Here is the TUTORIAL:
Materials.
All you need for this project is fabric, felt, scissors, embellishments of your choice and a glue gun.

{ FIRST }
Make the pillow case. I did mine using as a pattern another pillow case.
If you have a pillow case you love just skip this step.

{ SECOND }
Cat the length of a 9×12 piece of felt in half and then fold it in half again to make a pocket.

{ THIRD }
Trace the shapes of the themes of your pockets in the fabric and cut them out.

I thought it would be fun to change the pocket during the year accordingly to the seasons and special occasions. I made a little pattern for you just in case you need some help with the shapes.
{ click on the picture for the original size }

So I ended cutting a Christmas Tree, a little bird for Easter, a cupcake for birthdays and a heart for Valentines and Thanksgiving {have a thankful ♥}
Some other great ideas could include a tooth for the Tooth Fairy,or an apple for Back to School…
The possibilities are endless…

{ FOURTH }
Attach the shapes to the pockets…. Time to sew!

{ FIFTH }
Get creative, show your taste and decorate your pockets…
I used buttons, ribbon and yarn for mine.
…I think the little bird is my favorite 😉


{ SIXTH }
Close the pocket.
I used thin yarn to stitch both sides of the pocket together.
{ DO NOT CLOSE THE POCKET UNTIL YOU ARE DONE WITH THE EMBELLISHMENTS}

{ SEVENTH }
Add Velcro dots to the back of the pockets and to the pillow.

YOU ARE DONE!
Now all you have left is to fill up those pockets with best wishes, love notes,
inspiring thoughts, yummy treats and sweet dreams…

… Happy Friday!
Besos!
me 😉

I love your explanation of the color wheel 101! It made it easy for me to understand after all these years! Thank you!
You are very welcome Marilyn, thank you so much for visiting!
Just stumbled upon your website through pinterest today and cannot stop reading all of your posts! YOU ARE SO CREATIVE… I’m starting to wonder if this is all you ever think about!! haha!!
Anyways, I now know what I’ll be bringing to my Pinterst themed Christmas Party!! Thanks so much!
Keep posting so that I can get more ideas!! Kisses and Hugs from Texas!!
Brittany, what a sweet comment… you made my week!
Welcome to The 36th AVENUE my love!
Hey there! I’ve been reading your site for a while now and finally got the bravery to go ahead and give you a shout out from Kingwood Texas! Just wanted to say keep up the excellent work!
Kelly, you made my day!
Thank you so much my friend!
This is such a great idea and so darn cute! Our little girl is only 4 months old, but I can’t wait to make and use these when she gets a bit older…this is the stuff memories are made of!
Aww…
Thank you so much for the visit!
Hello. splendid job. I did not imagine this. This is a excellent story. Thanks!
Love this. Just gave my granddaughter 2 pillowcases I made to match her quilt. Need to get it back so I can add this cute pocket.
What a great idea. I love how special this can make each kid feel. I pinned it and will definitely get to it soon!
Meredith From A Mother Seeking Come find me on my blog, A Mother Seeking…
Thank you for visiting and taking the time to comment 😉