
I have three girls that have for a mother a girly girl.
What does this mean?
I love bows and they do too.

You’ll be surprise of how easy it is to make a bow.
Let me show you.
MATERIALS
15” of ribbon for the main bow.
2” of ribbon for the bow’s knot.
Glue gun, scissors and small elastic bands.
TUTORIAL
1
The size of the ribbon will determine how big your bow will be.
I like to use a 15” long piece of ribbon.
The first thing you are going to do is to place the ribbon upside down on top of a table .

2
Bring the top left corner down, as it’s showed on the picture.

3
Then bring the bottom right corner up.

4
Press the ribbon together, holding the middle and making the shape of a bow.

5
Hold the bow together placing an elastic band in the middle.
After it is secured you can adjust the bow making sure it looks just right.

6
With the help of a pair of scissors trim the ends to your like.

7
Now it is time to finish it!
Use a 2” piece of ribbon and loosely make a knot with it.
This would be placed in the middle of the bow to cover the elastic band.

8
Keeping the small piece of ribbon in place turn the bow around.
Add a little bit of hot glue to the back of it.
Make sure the glue won’t touch the elastic band.
Watch your fingers, please don’t get burned!

9
Fold the other side of the ribbon on top of the hot glue.
Press it together to make sure it holds.
Then cut the excess ribbon.

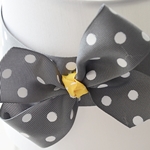
Turn it around… You are done!
You can add a hair clip on the back of it to decorate headbands or just embellish your hair.

Wasn’t that easy?
I will be back tomorrow showing you what I’m using this particular bow for.
A fun project is coming up!
Happy Monday!
Besos
Desirée

Wow so cute and you made it look so simple to make. Love it and will definitely try it. Thanks
Love how easy this is! I’ll have to try making some for my daughter!
I’m always looking for an easy way to make a cute bow! Thanks for the tutorial!
Thanks for this great and easy tutorial! I can’t wait to add some fabric bows to my crocheted hats for my nieces!
This tutorial is fabulous and I love the tip about not burning yourself. I have a nice blister from the hot glue gun as we speak. I will definitely be putting your tutorial to use. Thanks so much!
I hate when that happens… It hurts!
Anyways, thank you Jenny for stopping by and taking the time to leave a comment 🙂
When we had our first girl I think I went NUTS for making bows… Then our second girl went even more NUTS… Now we are expecting our 3rd girl so hopefully I can keep things not so NUTTY!!! 🙂 Can’t wait to see what your project is.
I can’t wait to share it… If you have girls I think you are going to love it!
Thank you for the visit!
I did this with wired ribbon to make bows for the Christmas tree. So easy and beautiful results.
Leslie, That is a great idea, to make them as ornaments… Thank you for the tip!
Thanks for the great instructions and photos. I’ve always wanted to make perfect bows, but the traditional ways never work for me. Maybe my teenage girls will allow me to make some bows for them…if not as hair bows, then maybe to decorate their bags or something? 🙂
Give it a try!
Thanks so much for the tutorial, Desiree! I have been wanting to make my daughter some barrettes and have been at a loss of how make a bow. This is perfect! Thank you!
You are welcome! Have fun creating!
Great bow tutorial Desiree (nice and simple which is always a bonus!).
Can’t wait to see what you do with the bow tomorrow!! Until then, have a wonderful day:)
Thank you Tani!
See you tomorrow…♥