
Hello 36th Avenue readers!
It’s Taryn from Design, Dining + Diapers!
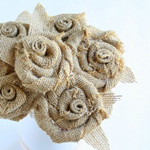
I’m excited to be here again sharing one of my newest spring projects, a DIY Burlap Bouquet.
I first saw this photo on Pinterest over a year ago and I have been dying to make one of my own ever since.
I’m so glad I finally got around to making it and now I get to share my experience with all of you, because yes it was an experience.

I made this rustic and elegant bouquet to place on my spring vignette this year.
It fits the theme perfectly and I can’t wait to put the final touches on the display.
You’ll have to check out my blog later this week for the full reveal!


Want to see how to make a bouquet that won’t need any watering?!
(my kind of deal)
Supplies:
Burlap cut into 3″ strips, Hot glue, Scissors, Wooden skewers (yes from the kitchen)
Ribbon to embellish the vase (optional)

Cut your burlap into 3″ strips. You can make your flowers as large as you would like but each of mine used a piece of burlap that measured around 3″ X 30″. I first tried them using 4-5″ wide pieces but they were too large. I think somewhere between 2 1/2-3″ is perfect for this type of rosette and with the thickness of the burlap.

When making rosettes, I typically start by twisting the center and then continue to twist in a circular motion, but because of the thickness of the burlap it wasn’t working as well for me. What I found was that by rolling the burlap a few times before starting the twisting created a more secure base and the burlap held better. I also placed a few drops of hot glue every few inches to hold the burlap in place. Just be careful about how much glue you use, it can easily show through if you use too much! Once the rosette was the size that I wanted, I finished it off and then flipped it over. I placed a dot of hot glue inside the center and then placed a wooden skewer in the center for a stem. You could also use branches for a more rustic look or pipe cleaners.

As I was making my bouquet, I just felt like something was missing. I needed a filler.
So I created a few simple leaves out of burlap and then attached two to each flower.
It added the fullness I was looking for.

To finish off the look I grabbed a simple white vase and added a few layers of lace and pink ribbon.
So fresh and so spring.
Thanks so much for having me over today, Desireé!


I am so glad that Taryn took the time to put this tutorial together for you guys.
You can use these rosettes for tons of different projects.
I have used them multiple times to decorate my wreaths
and even our shower curtain hooks.
You can use them for hair pieces and to make accessories.
Make sure to stop by Taryn’s blog Design, Dining + Diapers and thank her for her time.
While visiting there take a look at these amazing tutorials.

I love this table makeover.
You won’t believe how clever this DIY project is.

And here you have her DIY Planter… Awesome!

For more projects and inspiration from Taryn make sure to follow her…


Wishing you all a beautiful day!
Besos
Taryn and Desirée

Hi Desiree,
I used your tutorial to make flowers for a Lampshade that I just posted…Anyway, I just wanted to let you know that I gave your credit and to say Thank You!!!
I love your blog! 🙂
Denise
Thanks for having me over Desiree!
Your bouquet is so pretty. I too, have had trouble making those rosettes any bigger than about 3″. They just get too bulky in the burlap.
Judy
I’m glad I’m not the only one 🙂 Thanks for the comment!
Love these! I hope to make them soon!